
You’ve spent time building a design in Canva — now you need to get it out of the editor and into the world. Canva handles saving automatically, but exporting is where most users have questions: Which file format should I choose? How do I export at high resolution? Can I download just one page from a multi-page design? This guide covers everything about saving and exporting in Canva, from the basics to format-specific settings and common troubleshooting fixes.
How Canva Saves Your Work
Before getting into exporting, it’s worth understanding how Canva saves:
Canva saves automatically and continuously. There is no save button. Every change you make — moving an element, editing text, changing a color — is saved to the cloud in real time. You will never lose work by closing the browser tab or navigating away, as long as you’re connected to the internet.
You can confirm the design is saved by looking for the “All changes saved” message that appears briefly at the top of the editor after each action.
What If You Lose Internet Connection?
If your connection drops mid-edit, Canva continues to function locally. Changes made while offline are queued and synced automatically once your connection is restored. A warning indicator appears at the top of the editor when you’re offline.
Version History
Canva keeps a version history of your design, letting you roll back to earlier states if needed.
- Click File in the top menu
- Select Version history
- Browse previous versions by timestamp
- Click any version to preview it, then select Restore this version to revert
Version history is available on all plans, though Canva Pro retains a longer history.
How to Export (Download) Your Canva Design
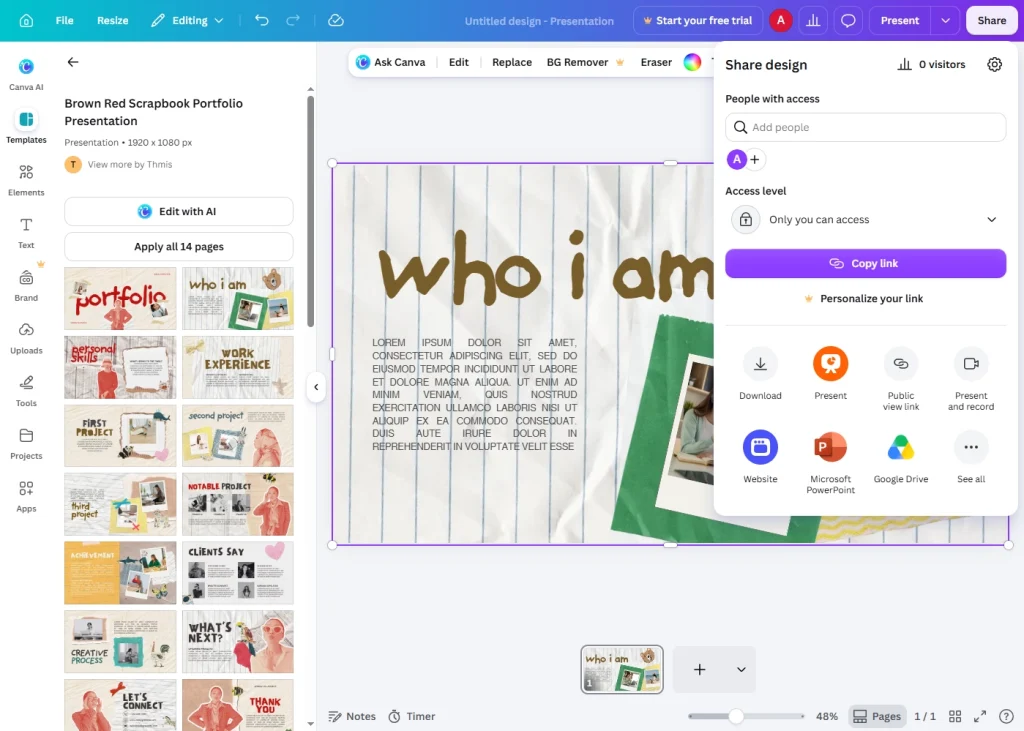
Exporting is separate from saving. Saving keeps your design in Canva’s cloud editor. Exporting creates a file you can download, send, print, or upload elsewhere.
Basic Export Steps
- Open your design in the Canva editor
- Click the Share button in the top right corner
- Select Download from the dropdown menu
- Choose your file type (see format guide below)
- Adjust any format-specific settings
- Click the Download button
Your file downloads to your device’s default downloads folder.
Canva Export File Formats: Which One to Choose
Choosing the right format is the most important export decision. Here’s a complete breakdown:
PNG (Recommended for Most Digital Uses)
- Best for: Social media posts, web graphics, logos, designs with transparent backgrounds
- Quality: Lossless — no quality degradation, sharp edges, supports transparency
- File size: Larger than JPG
- Transparency support: Yes (use when your design has a transparent background)
When to choose PNG:
- Exporting a logo to place on a website or document
- Any design where background transparency matters
- Graphics that will be scaled or reused frequently
JPG / JPEG (Best for Photos and Web)
- Best for: Photo-heavy designs, blog headers, email banners
- Quality: Lossy compression — slightly reduced quality, no transparency
- File size: Smaller than PNG, faster to load
- Transparency support: No (transparent areas export as white)
When to choose JPG:
- Designs dominated by photography
- Web images where fast load time matters
- When file size is a priority over maximum sharpness
PDF Standard (Best for Digital Documents)
- Best for: Sharing documents digitally — proposals, presentations, reports, ebooks
- Quality: Vector-based text stays crisp at any zoom level
- File size: Moderate
- Transparency support: Yes
When to choose PDF Standard:
- Documents that will be read on screen
- Files that need to be emailed or uploaded as a PDF
- Presentations shared as a download
PDF Print (Best for Professional Printing)
- Best for: Flyers, brochures, business cards, posters, any physical print job
- Quality: High-resolution 300 DPI, CMYK color conversion, crop marks and bleed included
- File size: Larger than PDF Standard
- Transparency support: Yes
When to choose PDF Print:
- Sending files to a professional printer
- Designs intended for physical output
- When color accuracy in print matters
Tip: When exporting as PDF Print, enable the Crop marks and bleed option in the export settings. This adds guides for the printer to trim accurately and prevents white edges on your final printed piece.
SVG (Best for Scalable Graphics)
- Best for: Logos, icons, illustrations that need to scale to any size without quality loss
- Quality: Vector — infinitely scalable with no pixelation
- File size: Small
- Transparency support: Yes
- Availability: Canva Pro only
When to choose SVG:
- Exporting logos for web use
- Designs that will be used at multiple sizes
- Graphics destined for web development or further editing in Illustrator or Figma
MP4 Video (For Animated Designs)
- Best for: Animated social media posts, video presentations, motion graphics
- Quality: Up to 1080p HD
- File size: Larger — depends on design length and complexity
- Availability: Available on all plans for designs with animation
When to choose MP4:
- Any design that includes animation, video clips, or transitions
- Social media video content (Instagram Reels, TikTok, YouTube)
- Animated presentations
GIF (For Short Looping Animations)
- Best for: Short looping animations for social media or email
- Quality: Limited color depth — best for simple animations, not photo-heavy content
- File size: Moderate to large depending on length
- Availability: All plans
When to choose GIF:
- Simple looping graphics for web or email
- When MP4 is not supported by the target platform
- Sticker-style animated graphics
Export Format Quick Reference
| Format | Best Use | Transparency | Resolution | Plan |
|---|---|---|---|---|
| PNG | Digital graphics, logos | ✅ Yes | Screen (72–96 DPI) | Free + Pro |
| JPG | Photos, web images | ❌ No | Screen (72–96 DPI) | Free + Pro |
| PDF Standard | Digital documents | ✅ Yes | Screen-optimized | Free + Pro |
| PDF Print | Professional printing | ✅ Yes | 300 DPI | Free + Pro |
| SVG | Scalable logos, icons | ✅ Yes | Vector (infinite) | Pro only |
| MP4 | Animated designs, video | N/A | Up to 1080p | Free + Pro |
| GIF | Short looping animation | ❌ Limited | Screen | Free + Pro |
How to Export Only Specific Pages
For multi-page designs, Canva lets you download all pages or select individual ones.
Export Specific Pages
- Click Share → Download
- Choose your file format
- Under Select pages, click the page range field
- Uncheck pages you don’t want, or manually enter page numbers (e.g., “1, 3, 5” or “2-4”)
- Click Download
Only the selected pages are included in the downloaded file.
Export All Pages
By default, all pages are included when you click Download. If the page selector has been changed, reset it to include all pages before downloading.
How to Export at Higher Resolution (Canva Pro)
Standard Canva exports are optimized for screen display. Canva Pro unlocks higher resolution export options.
Enable High-Resolution Export (Pro)
- Click Share → Download
- Choose PNG or JPG as the format
- Under Size, select a multiplier:
- 1x — standard screen resolution
- 2x — double resolution (sharper on high-DPI screens)
- 4x — four times resolution (for large-format prints and detailed graphics)
- Click Download
Note: Higher resolution multipliers produce significantly larger file sizes. Use 2x or 4x only when the output genuinely requires it — for large prints, billboard graphics, or high-DPI display assets.
How to Export with a Transparent Background
Transparent background export is one of Canva’s most-used Pro features — essential for logos and overlays.
Steps
- Make sure your design background is set to transparent (not a color or image)
- To remove the background: click the background → press Delete
- Or: click the background swatch in the toolbar → select the transparent option (checkerboard pattern)
- Click Share → Download
- Select PNG as the format (PNG is the only format that supports transparency)
- Check the Transparent background checkbox that appears
- Click Download
Your PNG downloads with a transparent background, ready to layer over any color or image.
Note: Transparent background export requires a Canva Pro subscription. Free plan users will see the option but are prompted to upgrade.
How to Share Your Design Without Downloading
Downloading isn’t always necessary. Canva offers several direct sharing options:
Share a View-Only Link
- Click Share → Copy link
- Set the link permission to Anyone with the link can view
- Share the link — recipients can view the design in a browser without a Canva account
Share an Editable Link
- Click Share → Copy link
- Set the permission to Anyone with the link can edit
- Share the link — recipients can open and edit the design in Canva
Publish to Social Media Directly
- Click Share
- Select a platform: Facebook, Instagram, Twitter/X, LinkedIn, Pinterest, and others
- Connect your account if prompted
- Add a caption and schedule or post immediately
Send to Another App
Canva integrates with several platforms for direct publishing:
- Google Drive — save directly to your Drive
- Dropbox — export to your Dropbox folder
- Slack — share to a Slack channel
- Mailchimp — send a design directly to an email campaign
Access these via Share → More to see all available integrations.
How to Export a Canva Presentation
Presentations have additional export options beyond standard designs.
Export as PDF
The most common format for sharing slide decks:
- Click Share → Download → PDF Standard
- All slides export as a single PDF, one slide per page
Export as PowerPoint (.pptx)
Convert your Canva presentation to an editable PowerPoint file:
- Click Share → Download
- Select PowerPoint (.pptx)
- Click Download
The exported file preserves layouts, fonts, and images. Some advanced Canva effects may not transfer perfectly — review in PowerPoint after exporting.
Present Directly from Canva
No download needed:
- Click the Present button (top right)
- Choose a presentation mode: Standard, Autoplay, or Presenter view
- Present directly from the browser in full screen
Common Export Issues and Fixes
| Problem | Cause | Fix |
|---|---|---|
| White background on PNG export | Transparent background not set correctly | Delete the background element, then re-export with Transparent background checked |
| Blurry or pixelated export | Exporting at screen resolution for a large-format print | Use PDF Print (300 DPI) or export PNG at 2x/4x (Pro) |
| Fonts look different after export | Font not embedded in PDF | Use PDF Standard or PDF Print — both embed fonts; avoid JPG/PNG for text-heavy docs |
| File size too large | High-resolution PNG or uncompressed MP4 | Switch to JPG for photos, or reduce export resolution |
| Download button grayed out | Connectivity or browser issue | Refresh the page, clear browser cache, try a different browser |
| Only one page downloads | Page selector filtered to one page | Check the page selector in the download panel and include all pages |
| Colors look different when printed | RGB to CMYK conversion shift | Use PDF Print, which handles CMYK conversion; do a test print before the full run |
Frequently Asked Questions
Q1:Does Canva save automatically?
Yes. Canva saves every change automatically and continuously to the cloud. There is no manual save button. Your design is safe as long as you have an internet connection during editing.
Q:2:Can I export a Canva design as an editable file?
Canva designs export as finished files (PNG, JPG, PDF, MP4). The only editable export format is PowerPoint (.pptx) for presentations, or SVG (Pro) for vector graphics. You cannot export a native Canva file for editing in other design tools.
Q3:Is high-resolution export free in Canva?
Standard resolution export is free for all users. High-resolution multipliers (2x, 4x) and transparent background PNG export require a Canva Pro subscription.
Q4:How do I export a Canva design as a Word document?
Canva does not export to .docx format. The closest option is exporting as PDF, which can then be converted to Word using Adobe Acrobat, Microsoft Word’s built-in PDF import, or a free online PDF-to-Word converter.
Q5:Can I download a Canva design without a watermark?
Canva designs do not have watermarks on export for either free or Pro users — as long as all elements used are licensed correctly. If you’ve used a Pro stock element on a free plan, that element may be watermarked in the export. Replace it with a free alternative or upgrade to Pro to remove the watermark.
Q6:How many times can I download a Canva design?
Unlimited. You can download the same design as many times as you like, in any supported format, with no download limits on any plan.
Final Thoughts
Canva’s saving system takes care of itself — so exporting is really the only step that requires deliberate attention. The key decisions are straightforward once you know the logic: PNG for digital graphics with transparency, JPG for photo-heavy web images, PDF Print for anything going to a physical printer, and MP4 for anything animated.
Master the export panel, know your format options, and you’ll spend less time troubleshooting file issues and more time designing.
Ready to export? Click Share → Download in any Canva design, pick your format, and your file is ready in seconds.