
Whether you’re a small business owner, a student, or a content creator, the Canva dashboard is the starting point for every design you’ll ever make. Understanding how the Canva interface works will save you time, help you find the right tools faster, and make your entire design workflow smoother.
This beginner’s guide walks you through every key section of the Canva home dashboard — from the sidebar navigation to the editor, templates, and beyond.
What Is the Canva Dashboard?
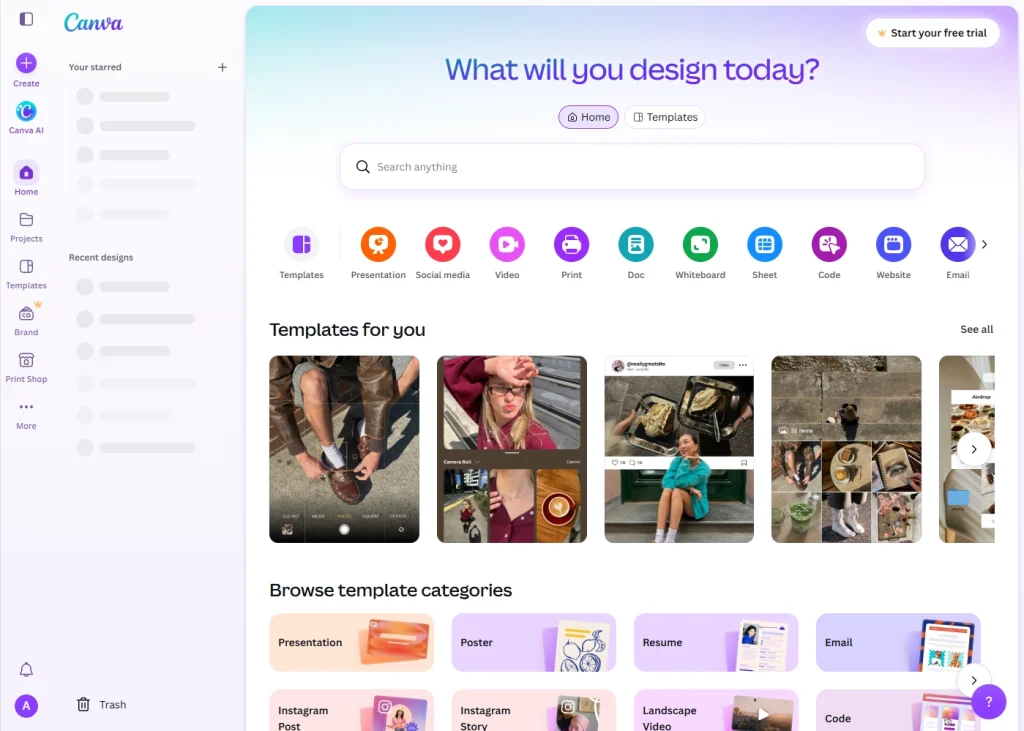
The Canva dashboard (also called the Canva home screen) is the first thing you see after logging into your Canva account. It acts as your central command center — giving you quick access to your recent designs, the template library, uploaded assets, and team projects.
The Canva home dashboard — your starting point for every design
Canva is a browser-based graphic design tool used by over 170 million people worldwide. Its drag-and-drop editor and pre-built templates make professional design accessible to anyone, even with zero prior experience.
The Canva Home Screen: What You See First
When you log in to Canva, the home screen presents you with everything you need to get started quickly:
- Search bar at the top — Search for any design type, template, or asset. Try searching “Instagram post,” “resume,” or “business card” to see instant template suggestions.
- Create a design button — The purple button in the top-right corner. Click it to choose a custom canvas size or pick from popular format presets like A4, Presentation (16:9), or Instagram Story.
- Recent designs — Your latest projects appear at the top of the dashboard so you can jump back in without hunting through folders.
- Template suggestions — Canva recommends templates based on trending designs and your past usage, making it easy to find inspiration quickly.
💡 SEO Tip for Creators: If you use Canva to create blog graphics or social media content, starting from the right template size (and naming your designs clearly) will keep your workflow organized as your content library grows.
Canva Left Sidebar Navigation Explained
The left sidebar is the backbone of the Canva interface. Every major section of the platform is accessible from here.
The Canva sidebar gives you quick access to all core features
Home
Takes you back to the main dashboard from anywhere in the platform.
Templates
Browse Canva’s full library of 600,000+ professionally designed templates, organized by category — social media, marketing, education, business, print, and more. Use the Free filter to show only no-cost templates.
Projects
Your personal file manager inside Canva. Organize designs into folders, share project folders with teammates, and keep client work separate from personal projects.
Brand Kit (Canva Pro)
One of the most powerful Canva Pro features — store your brand colors, fonts, and logo in one place. Every time you open a design, your brand assets are ready to apply in one click, keeping every piece of content visually consistent.
Uploads
Upload your own images, logos, videos, audio clips, or custom fonts directly into Canva. Uploaded files are stored in your account and available across all your designs.
Inside the Canva Editor: A Full Breakdown
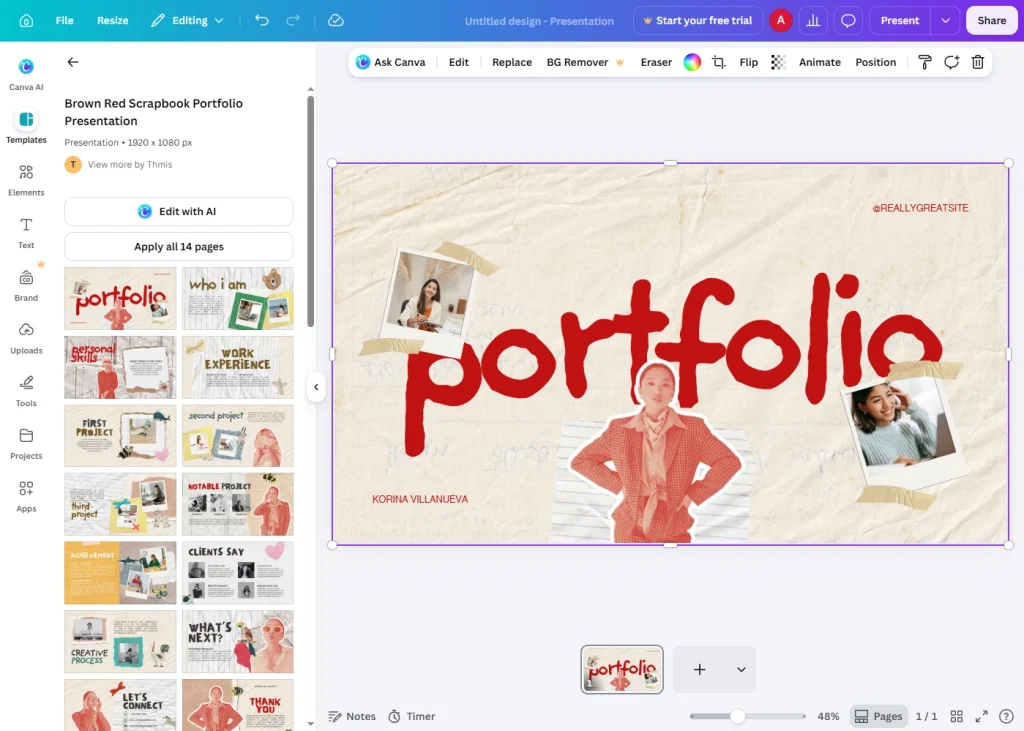
Clicking on any template or creating a new design opens the Canva editor — where all the actual design work happens. The editor is cleanly divided into four zones:
The Canva editor interface, broken down by zone
Left Asset Panel
This panel holds every creative resource available to you: templates, elements (shapes, illustrations, charts), text styles, photos, videos, backgrounds, and AI tools. Everything is searchable from within the panel.
Center Canvas
The large white workspace in the middle is your design canvas. Drag any element from the left panel onto the canvas, click to select and edit, and arrange everything to your liking. You can zoom in and out and use the spacebar to pan around on larger designs.
Top Toolbar
The toolbar at the top changes dynamically depending on what you have selected. Select a text box and you’ll see font, size, color, and alignment options. Select an image and you’ll get crop, flip, and filter tools. Select a shape and color and transparency controls appear.
Pages Panel (Right Side)
For multi-page designs like presentations or booklets, the pages panel on the right lets you add new pages, duplicate existing ones, reorder them by dragging, and see a thumbnail overview of your whole document.
Essential Canva keyboard shortcuts:
| Shortcut | Action |
|---|---|
Ctrl + Z | Undo |
Ctrl + D | Duplicate element |
Ctrl + G | Group elements |
T | Insert text box |
R | Insert rectangle |
Space + drag | Pan the canvas |
How to Use Canva Templates Effectively
The Canva template library is one of the platform’s biggest selling points. With over 600,000 templates across dozens of categories, you can find a starting point for almost any design need.
Canva’s template library covers every design category
Most Popular Canva Template Categories
Social Media Templates — Canva has purpose-built templates for every major platform: Instagram posts and Stories, Facebook covers, YouTube thumbnails, LinkedIn banners, Pinterest pins, and TikTok video formats. Each is pre-sized to the exact pixel dimensions each platform requires.
Presentation Templates — Canva presentations are a strong alternative to PowerPoint or Google Slides. Templates come with cohesive slide sets, speaker notes, and Canva’s built-in Present mode for live delivery.
Print Design Templates — Business cards, flyers, brochures, posters, menus, and invitations. Download as high-resolution PDFs for professional printing, or order prints directly through Canva Print.
Marketing & Business Templates — Proposals, reports, email headers, ad banners, and pitch decks. These are especially useful for freelancers and small businesses that need polished materials without a dedicated design team.
🔓 Templates marked with a crown icon (👑) are Canva Pro exclusives. Everything without the crown is completely free to use.
Canva Elements: Photos, Graphics, Charts, and AI Tools
The Elements panel inside the Canva editor is where you find all the creative building blocks for your designs.
Stock Photos & Illustrations
Canva includes millions of royalty-free stock photos and vector illustrations. Search by keyword and drag directly onto your canvas — no licensing headaches, no external downloads needed.
Shapes, Lines & Frames
Basic shapes (circles, rectangles, triangles), decorative lines, icon sets, and photo frames are all available and fully customizable in color, size, and opacity.
Charts & Data Visualizations
Insert a chart, enter your own data, and Canva generates a clean, styled visualization — bar charts, pie charts, line graphs, progress bars, and more. Ideal for reports and presentations.
Video & Audio
Add video clips, animated backgrounds, or royalty-free music tracks to bring designs to life. Canva’s video editor supports trimming, transitions, and text overlays.
Magic Media — AI Image Generation
Type a description and Canva’s AI (Magic Media) generates a custom image in seconds. This is one of Canva’s most useful AI features for content creators who need unique visuals that don’t exist in any stock library.
Canva’s Elements panel, including AI-powered tools
Canva Free vs. Canva Pro: Which Plan Do You Need?
Canva’s free plan is genuinely capable — most individuals and small teams can get a lot done without spending a cent. Here’s a clear comparison of what each plan offers:
| Feature | Canva Free | Canva Pro |
|---|---|---|
| Templates | 250,000+ | 600,000+ |
| Cloud Storage | 5 GB | 1 TB |
| Brand Kit | ✗ | ✅ Up to 100 brand kits |
| Background Remover | ✗ | ✅ One-click |
| Magic Resize (resize to any format) | ✗ | ✅ |
| AI Features | Limited monthly uses | More monthly uses |
| Custom Font Upload | ✗ | ✅ |
| Schedule Social Media Posts | ✗ | ✅ |
Who Should Upgrade to Canva Pro?
- Freelancers and agencies managing multiple client brands
- Content creators publishing across many platforms who need Magic Resize
- Small businesses that want a consistent brand identity with Brand Kit
- Teams producing high volumes of designs who need the extra storage and AI credits
💰 How to Get Canva Pro Free:
- 30-day free trial for all new Pro accounts
- Canva for Education — fully free for verified students and teachers
- Canva for Nonprofits — free Pro access for registered non-profit organizations
Getting Started With Canva: Your First Design
The fastest way to learn the Canva dashboard is to make something right now. Here’s how to go from zero to a finished design in minutes:
1. Open canva.com and sign in Use your Google account for the fastest setup. Your dashboard loads immediately after authentication.
2. Search for your design type Type what you need — “Instagram post,” “business card,” “presentation” — in the top search bar. Canva will show you matching templates instantly.
3. Choose a template and open the editor Click any template to preview it, then click Customize this template to open it in the editor.
4. Edit the text Click on any text element to select it, then type your own content. Change the font, size, or color from the toolbar at the top.
5. Swap the images Click on a photo in the template, then use the Photos or Uploads tab in the left panel to replace it with your own image or a stock photo.
6. Download or share Click Share in the top-right corner to download your design (PNG, JPG, PDF, MP4), share a link, or publish directly to social media.
Final Thoughts on the Canva Dashboard
The Canva dashboard is designed to make design intuitive — and it delivers on that promise. From the organized sidebar navigation to the flexible editor and the enormous template library, every part of the interface is built to help you create faster.
Whether you’re using the free Canva plan for occasional projects or upgrading to Canva Pro for a full brand workflow, understanding the dashboard is the foundation everything else builds on. Spend 15 minutes exploring the interface today, and you’ll be producing great-looking designs by tomorrow.
Start designing at canva.com →