
A great thumbnail can make the difference between a video that gets clicked and one that gets scrolled past. Canva makes it simple to design eye-catching, properly sized YouTube thumbnails — even if you have no graphic design experience — thanks to ready-made templates, easy photo editing, and bold text tools built right into the editor.
In this guide, you’ll learn exactly how to create a YouTube thumbnail in Canva, customize it to stand out, and export it in the right format for uploading.
Why a Good Thumbnail Matters
Your thumbnail is often the first thing a potential viewer sees, alongside your title. A strong thumbnail can:
- Increase your click-through rate by standing out in search results and suggested videos
- Clearly communicate what your video is about at a glance
- Reinforce your channel’s branding and visual consistency
- Help your video compete against others in a crowded feed
Step 1: Start a New Design with the Right Dimensions
- Log in to Canva and click Create a design in the top-right corner.
- Search for “YouTube Thumbnail” in the search bar.
- Select the YouTube Thumbnail template size, which is automatically set to the correct dimensions (1280 x 720 pixels).
Starting with the right size ensures your thumbnail won’t get cropped or distorted when uploaded.
Step 2: Choose a Template (Or Start from Scratch)
Canva offers a large library of pre-made YouTube thumbnail templates:
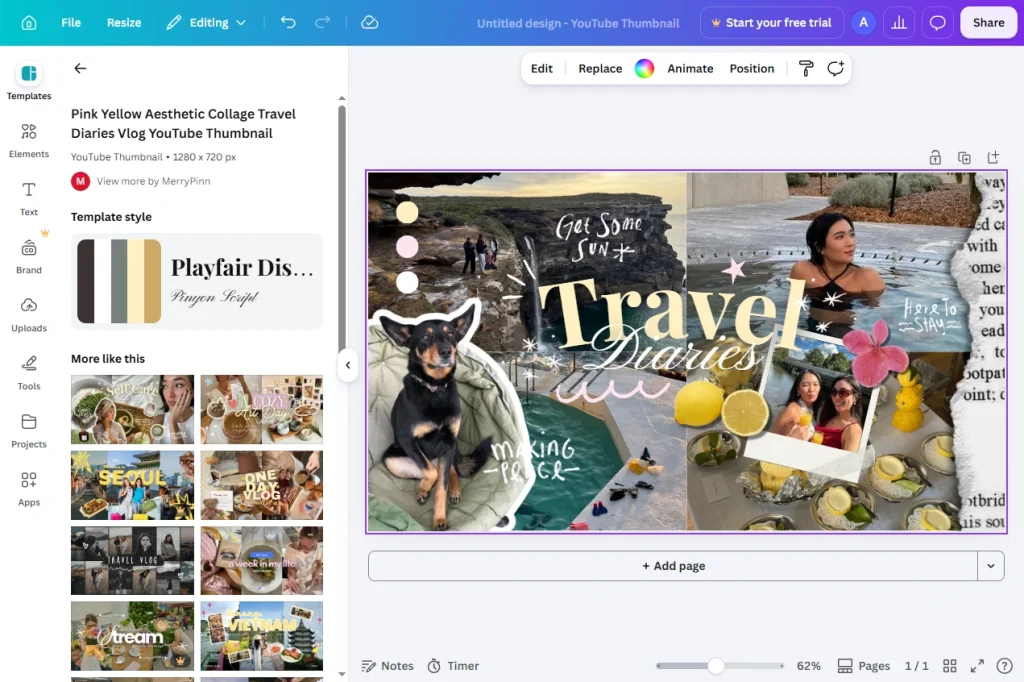
- Browse the templates shown on the design page, or use the search bar within the Templates panel to search for a specific style (e.g., “gaming thumbnail,” “vlog thumbnail,” “tutorial thumbnail”).
- Click a template you like to apply it to your canvas.
If you’d rather build one from scratch, simply close the template panel and start with a blank canvas instead.
Step 3: Add Your Main Image
- Click Uploads in the left-hand sidebar.
- Click Upload files and select a photo or screenshot from your device — ideally a clear, high-resolution image related to your video.
- Drag the image onto your canvas and resize it to fill the frame.
For thumbnails featuring your face or a product, choose an image with good lighting and a clear focal point so it reads well even at a small size.
Step 4: Remove or Edit the Background (Optional)
To make your subject pop, you can remove the background of your photo:
- Select the uploaded image.
- Click Edit photo in the toolbar.
- Select BG Remover (available on Canva Pro) Or use our free online tool.
- Once removed, add a new background color, gradient, or image behind your subject.
Step 5: Add Bold, Readable Text
Thumbnails need to be readable even at a small size, so bold and concise text works best:
- Click Text in the sidebar and select a heading style, or add a text box manually.
- Type a short, attention-grabbing phrase — usually 3 to 6 words.
- Increase the font size significantly and choose a bold, thick font for maximum visibility.
- Use the color picker to make the text contrast strongly against the background (e.g., white or yellow text on a dark background).
Step 6: Add Shapes, Icons, or Arrows for Emphasis
To draw attention to a specific part of your thumbnail:
- Click Elements in the sidebar.
- Search for arrows, circles, or icons that fit your theme.
- Drag them onto your canvas and position them near your text or subject.
Common techniques include circling a key detail, adding an arrow pointing to a reaction, or placing a bold shape behind your text for contrast.
Step 7: Apply Your Brand Colors and Fonts (Optional)
If you have a Brand Kit set up, keep your thumbnail consistent with your channel’s overall look:
- Click the Brand tab in the toolbar.
- Apply your saved brand colors to text, shapes, or the background.
- Select your brand fonts from the font dropdown when formatting text.
This helps build recognition so viewers associate your visual style with your channel over time.
Step 8: Review Your Thumbnail at a Small Size
Since thumbnails appear small in YouTube’s interface (especially on mobile), it’s important to check readability:
- Zoom out or shrink your browser view to see how the design looks at a smaller size.
- Make sure your text and main subject are still clear and legible.
- Simplify any cluttered elements that get lost at a smaller scale.
Step 9: Download Your Thumbnail
Once you’re happy with the design:
- Click Share in the top-right corner.
- Select Download.
- Choose PNG or JPG as the file type (PNG is generally preferred for sharper quality).
- Click Download to save the file to your device.
Step 10: Upload the Thumbnail to YouTube
- Go to YouTube Studio and open your video (or start a new upload).
- In the video details section, find Thumbnail.
- Click Upload thumbnail and select the file you downloaded from Canva.
Common Issues With YouTube Thumbnails
Thumbnail looks blurry after uploading Make sure you started with the correct 1280 x 720 pixel dimensions and downloaded as PNG for the best quality.
Text is hard to read at a small size Increase font size and boldness, and make sure there’s strong contrast between the text and background color.
Design looks cluttered Limit your thumbnail to one clear focal point, a short text phrase, and minimal extra elements — too many competing details reduce impact.
Custom thumbnails option is missing in YouTube Studio Custom thumbnails require a verified YouTube account. If you don’t see the option, verify your channel through YouTube’s account settings first.
Tips for Designing Effective Thumbnails
- Keep text short — aim for 3 to 6 words that create curiosity or clearly state the topic.
- Use high-contrast colors so your thumbnail stands out in a crowded feed.
- Show emotion or reaction in photos featuring faces, since expressive images tend to draw more clicks.
- Stay consistent with fonts and colors across your videos so viewers recognize your channel at a glance.
- Test different versions by creating a few variations and reviewing which one is clearest and most eye-catching before publishing.
Final Thoughts
Designing a YouTube thumbnail in Canva is quick once you know the process — start with the right size, add a strong image, bold text, and a bit of visual emphasis, and you’ll have a scroll-stopping thumbnail ready to upload in minutes.
Next time you publish a video, put as much care into your thumbnail as your content — it’s often what gets the click in the first place.